Showing posts with label Autumn cooking. Show all posts

Tuesday, September 13, 2011

Tasty Tuesday - Apple Galette for Two

 There's almost nothing better than a rustic French apple tart or Galette to help usher in the Fall season. I cut the recipe in half because there are only two of us at home now, but if you double it this will serve 10 to 12 people. I started with 1 cup of flour into which I whisked in 2 tablespoons of sugar and 1/2 teaspoon of salt. I then added 5 tablespoons of cold butter cut up, and pinched it into the flour until all large lumps were gone. No photos I know, I had an OOPs! moment there. :-) Then I  took 2 tablespoons of plain yogurt and one of sour cream and stirred those in. I made a ball of dough and flattened it on a sheet of waxed paper and wrapped and put it in the fridge to chill for 30 minutes while I made the filling. First though, I took two layers of tin foil and marked off a 10 inch circle using my springform pan. For a full size Galette you will need at least a 12 to 13 inch circle. Make sure the shiny side is facing down on the foil. Then I brushed on an eight inch circle of butter. The edges of the dough will be folded up over the fruit filling so you don't want it to stick to the foil.
 The filling consists of 2 generous cups of thin apple slices, 1/4 cup chopped walnuts, 1 tablespoon lemon juice, 3-4 tablespoons of brown sugar, 1/4 teaspoon apple pie spice and 1/4 teaspoon nutmeg, 1 heaping tablespoon flour. Gather for later, apple jelly or apricot preserves, ( I used this) and 3 tablespoons graham cracker or plain bread crumbs.
 Combine fruit, sugar, seasonings, nuts and flour and stir well. Now take out your disk of dough and roll it out into a 10 inch circle on your buttered foil with a floured rolling pin.
 Now you are ready to put this together. Whisk a tablespoon of water into an egg, and brush over dough. Now take 1/3 cup jelly or preserves and spread over that. Then sprinkle your crumbs over that and pour filling on top of that, mounding it to stay within an 8 inch area.
 Gently lift the crust edges to fold over the outside of the apple filling. Pinch cracks together and brush crust with egg wash. Sprinkle with a dusting of sugar over the whole thing. Slide the Galette, foil and all, onto a cookie sheet and bake on a lower rack in a preheated oven at 425 degrees for 15 minutes, then lower the temperature to 350 degrees and bake for another 25 to 30 minutes, until the apples are done and the crust is golden brown.
 Brush a bit of fruit jelly or preserves over fruit to give it a nice shine.
Whalaa! Apple Galette for Two!  Serve with warm vanilla ice cream or whipped cream. Soooo yummy Kent wants this for breakfast tomorrow. Enjoy!

Apple Galette for Two
CRUST
1 cup flour
5 T. cold butter
2 T. sugar
1/2 t. salt
FILLING
2 c. thinly sliced apples
1/4 c. chopped walnuts
3 T. brown sugar
1/4 t. each apple pie spice and nutmeg
1 T. lemon juice

1 egg whisked with 1 T. water
1/2 cup apple jelly or apricot preserves
 3 T. graham cracker or plain bread crumbs

Tuesday, March 29, 2011

Tasty Tuesday - Mexican Pesto

 I had a grundle of cilantro as in two bunches so I needed to do something that would use large quantities at one time. So I poked around the internet and found some recipes, but I didn't have all the ingredients listed so I improvised. Listed below will be the full recipe with possible changes. For now, lets start with 4 cups of cilantro leaves....
 and 1/2 a cup EVOO as Rachel Ray says, or (extra virgin olive oil) for those in Imbler.....
 Put this in a blender with 4 cloves of garlic, or the equivalent of garlic powder...
 add 1/4 cup Asiago or Cojita cheese (which would be more authentic but go with what you have)
 two Chipotle peppers in adobo sauce....
 1/2 teaspoon salt....
 1 tablespoon of dry oregano, or 1/4 cup fresh if you have it...
 Pulse in the blender.....
 add 2 cups of cilantro and pulse some more.....
 add the rest of the cilantro plus 1/4 cup toasted almonds, or pine nuts and pulse some more...
until it looks like this! I haven't decided what to do with it yet as I had to make it and then make my weekly trip in to stay and help out the in-laws, but I'm thinking that maybe this could be spread on tortillas or mixed with cream cheese or sour cream, used on top of grilled fish or chicken. I will test run this when I get home and let you know my favorites. Let me know if you try this and see what you like to do with it. 
MEXICAN PESTO
4 cups cilantro leaves
1/2 cup extra virgin olive oil
1/4 cup Asiago or cojita cheese
4 cloves garlic
1/2 teaspoon salt
1 tablespoon dry oregano or 1/4 cup fresh
2 chipotle peppers in Adobo sauce
1/4 cup roasted pine nuts or toasted almonds

In a blender pulse together the oil, cheese, garlic, salt, oregano, and Chipotles. Add 2 cups of cilantro and pulse some more, then add the rest of the leaves and the nuts and pulse until a nice consistency. Makes about 1 cup total. Enjoy!
As a side note, we tried this on fish tacos the other night and hubby loved it! Just spread on tortillas before adding other toppings. Soooooo good. :-)

Thursday, December 9, 2010

Cran-Apple Dream Pie

 The other night we were having friends over for dinner. Hubby was fixing his delicious Chicken Curry with a lot of spice so I decided to create a creamy yet refreshing pie with a holiday flare. although there are several steps, this really is an easy peasy and so yummy pie, well worth the little bit of time put into making it. The cranberries can be rough chopped in the blender or food processor. Save yourself the headache of trying to chop each little cranberry or chasing them around the counter or floor. It's amazing the places you will find them later. ;-)
I used crumbs created from stale doughnuts that I cubed and lightly toasted before turning to crumbs as part of my crust ingredients but there are more possibilities such as crumbed short bread cookies, or the regular graham cracker crust. So I'm stating graham cracker crumbs in the recipe, but be creative! I never let anything go to waste, so if cookies are getting a bit dry or the same with cake, I just cube or crumble them up and dry them in the oven so I can use them for sweet crumb crusts later.
This pie has two main layers, one a creamy dreamy whipped cream cheese and whipped cream layer with a touch of grated orange peel. The other a fresh chopped cranberries and apples in jello. I used cherry jello as I didn't have raspberry, but try either and see which you like better. Cherry was very good, but I really want to try raspberry next time. Okay enough of this nonsense, on to the recipe!

CRAN-APPLE DREAM PIE
Serves 8
CRUST
1 1/2 c. sweet crumbs from graham crackers or shortbread cookies
1/4 c. sugar
1/4 c. butter, melted
In a 9" pie plate combine ingredients and press onto bottom and up the sides of the dish. In a pre-heated 350 degree oven bake for 5 minutes. Let cool on wire rack.

CREAM CHEESE LAYER
1- 8 oz. package cream cheese, softened
1/2 c. heavy whipping cream, whipped, buy a pint container of whipping cream so you have some for topping as well.
1/2 t. vanilla extract
1-2 t. greated orange rind
1/2 - 3/4 c. powdered sugar, to taste
In a mixing bowl beat cream cheese until soft and fluffy, add powdered sugar, vanilla, and orange rind, mix well. Gently fold in whipped cream until fully incorporated. Don't beat heavily as whipped cream will lose it's stiffness and the creamy filling will be too soft. Spread into the cooled crust and let set in the refrigerator while preparing jello layer. 
JELLO LAYER
1- 3 oz. box Cherry or Raspberry Jello
1 c. boiling water
3/4 c. cold water
1 c. each chopped apple and cranberries
1/2 c. sugar
In a medium size bowl combine jello, sugar and boiling water, stirring to dissolve. Add cold water and let soft set in refrigerator. Add fruit and stir gently. Carefully spoon over cream cheese layer in pie plate. Let set until firm, about 1-2 hours.

WHIPPED TOPPING
1 1/2 c. whipping cream
3-4 T. powdered sugar
1 t. vanilla extract
In a mixing bowl combine ingredients and whip until soft stiff peaks form. Add a dollup to each piece of pie when served.

Sunday, November 21, 2010

Harvest Pumpkin Pie

Comfort food is always a winner when the weather turns cold and a blanket of snow is covering everything. Last night we had the missionaries over for dinner. I always like to ask if there's anything they can't or won't eat as well as something they would like to have. The request was for meatloaf, shrimp and pumpkin pie. Who would have thought that a missionary from Mexico City would ask for pumpkin pie, but he had tasted some last year and really wanted to try it again. Far be it from me to deny this industrious young man his wish.
I decided to try a "flaky" crust recipe and a twist on the old favorite. For the crust I started with 2 1/2 c. unsifted all purpose flour and whisked  in 2 T. sugar and 3/4 t. salt. With my pastry blender I cut in 10 T. cold butter and 3 T. lard, but you can use shortening if you prefer. I just happened to have the lard around for tortillas and never have shortening, so there you go. No, this isn't your health conscious recipe. What?! Hey, you don't have to eat the whole pie in one sitting just because it's totally delicious and creamy and wonderfully yummy.... ;-)

After the flour and fats were blended to a crumbly mixture I added 1 large egg, and then sprinkled on 1 T. white vinegar, and about 4 T. ice cold water. I took my trusty fork, and gently folded the wet into the dry. Be careful not to work it too much or your crust will be tough. When the dough sticks together nicely create to balls of dough and then flatten them into disks to wrap and chill in the refrigerator for at least 30 minutes. Roll out your dough on a lightly floured board and use your pie pan, a 9" one will do for this pie. The other dough disk can be frozen or used for another pie. Invert your pie pan onto the dough and cut about 1 to 1 1/2" away from the edge, all the way around. Gently pick up the dough by one edge and fold it over to the other, lift this into your pie pan and lay open. DO NOT stretch the dough to get it to fit into the pan otherwise it will shrink away from the sides of the pie plate and you will have a much smaller crust than expected. Fold over and crimp the edges. See how pretty?
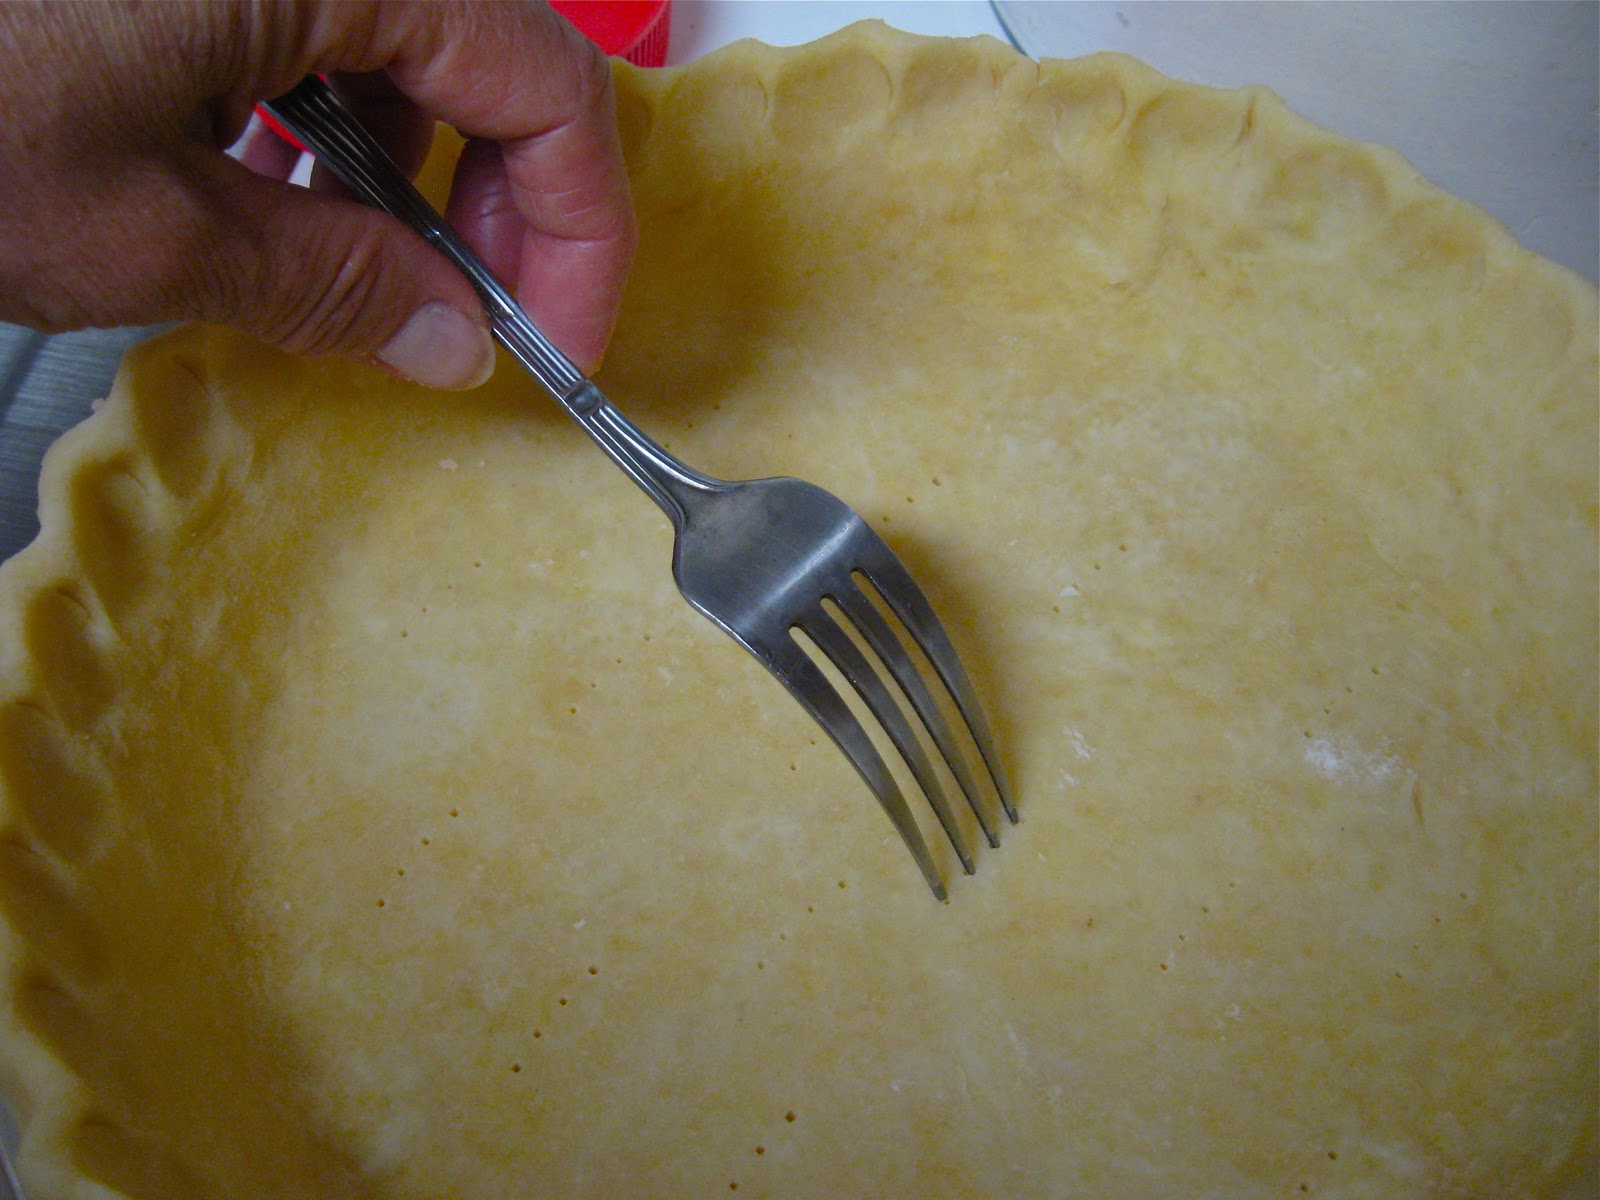
Next you lightly prick the bottom of the crust but try not to pierce through to the dish. Heat your oven to 425 degrees as you will be partially baking this crust empty. This helps insure that your crust is nicely cooked from top to bottom.  Now you need a square piece of foil, place that onto the crust, then add  some dry rice or beans to fill the foil about 3/4 of an inch. This keeps your crust from puffing up during the baking process. Bake for 12 minutes, then remove the foil and rice and bake for 3-5 more minutes until the crust is no longer translucent and is just beginning to look golden. Take out the crust and put a flat baking pan in the center oven rack.
Make a glaze with one egg white (save the yolk to use later)  and 1 T. water whisked together. Brush this over the bottom and sides of the crust to help seal it. Cool on a wire rack.
In a mixer bowl combine 2 cups of pureed pumpkin, with 2 eggs plus the saved yolk. Beat well.

I thought this was a cool shot so I added it for fun...
Add 1/2 c. sugar
1 cup cream or canned milk
Now, the yummy part! Add 1/2 cup real maple syrup, or if you must, maple flavored syrup. I used the real deal. To that add 2 t. pumpkin pie spice or a blend of cinnamon, nutmeg, cloves and ginger, as well as 1/2 t. salt. For those of you who like to skip the salt, DON'T!!! Oh sorry, a flash back to my Mommy days.... Now then if you leave out the salt, your pie will not have the fullness of flavor a good pie should have. Just saying...... Okay cooperate blogger! Sheesh, I'm almost done and you have to get fussy! Alrighty then, I guess I will finish up here, above the photo, so into the oven your pie is carefully placed, onto the baking pan. Bake at 425 degrees for 15 minutes and then turn the oven down to 350 degrees and continue to bake the pie for another 45 minutes. To keep the edge of the crust from browning you will want to make a foil cover for the edges, or you can buy a nice metal crust protector at any fine cookware store. Take your pie out and let it cool on a rack before covering and chilling for at least 4 hours before serving. Serve with your favorite topping. Oh yeah, those cute little leaf cutouts I made and took a picture of that you see at the top of these photos never made it on top of the pie. It would have looked wonderful but, well I reached into the cupboard without looking and managed to dust them with seasoning salt instead of cinnamon sugar. They make great crackers, but somehow I don't think the blend of garlic and onions in the seasoning salt goes with pumpkin pie. Maybe I'm wrong....yeah, you're right, I'm not. :-) I hope you give this recipe a try. In the immortal words of the late and great Miss Julia....Bon Appetite!

Monday, October 4, 2010

Applesauce Time!


There's a light rain drizzling down as the pot of applesauce simmers on the stove. The sweet smell of cinnamon and apples drifts through the house, evoking feelings of home and hearth and comfort. What is it about home made applesauce that wraps you in a feeling of security, like a downy blanket? As the twins and I sample some of the slightly spicy mixture of apples, sugar, lemon juice and spices, they cheer me on when I load up another spoonful for one of them. I remember when I was young that Mom would make a delicious pork roast with gravy, potato pancakes, and we would have applesauce and green beans as our sides. Yum!
Applesauce is probably one of the simplest foods to make. Peeled and cored apples, a little liquid if needed to keep the apple slices from sticking until they release their juices and turn soft, and a bit of sugar if you desire. I added a bit of Cinnamon Plus from Pampered Chef as I wanted something almost dessert like for a cool Autumn evening. 
Wondering what variety of apple to use for making applesauce? Golden Delicious and McIntosh are recommended although I had Galas and they made a delicious applesauce. For an extra special treat, if you have pears, try a half and half version of pears and apples, so yummy! There are a myriad of places to look up recipes for applesauce, especially if you want to can it. Here's a link for some more information. CANNING APPLESAUCE I hope you give it a try!